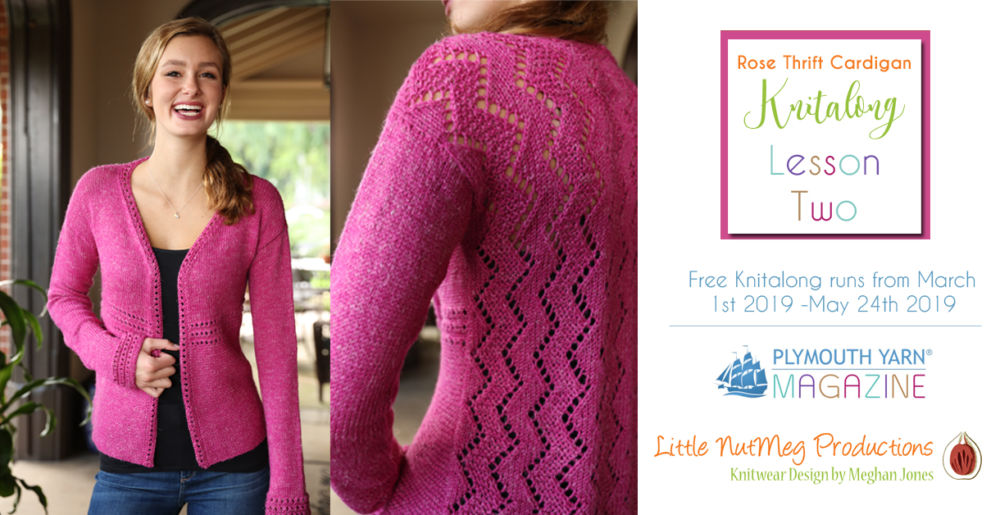
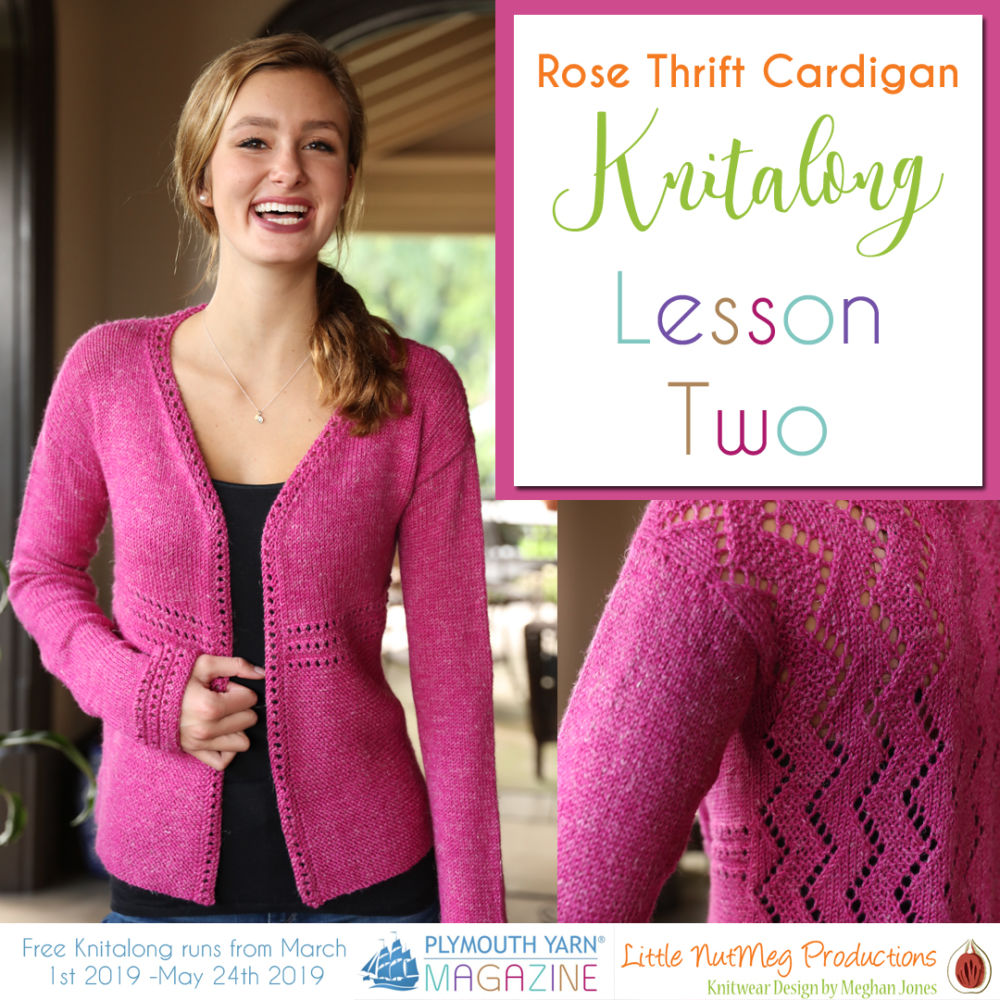
Welcome to the Rose Thrift Cardigan Knit along
Hosted by Plymouth Yarn Company and Meghan Jones of Little NutMeg Productions.
Join me (Meghan) as we work through every step of the gorgeous Rose Thrift Cardigan from planning to finishing and make yourself (or a friend) a spectacular knitted cardi!
In the First Lesson, we took a look at the schematic, chose what size to knit based on measurements and talked about easy adjustments that could be made with needle sizes. If you missed that lesson, check it out here!
Lesson 2
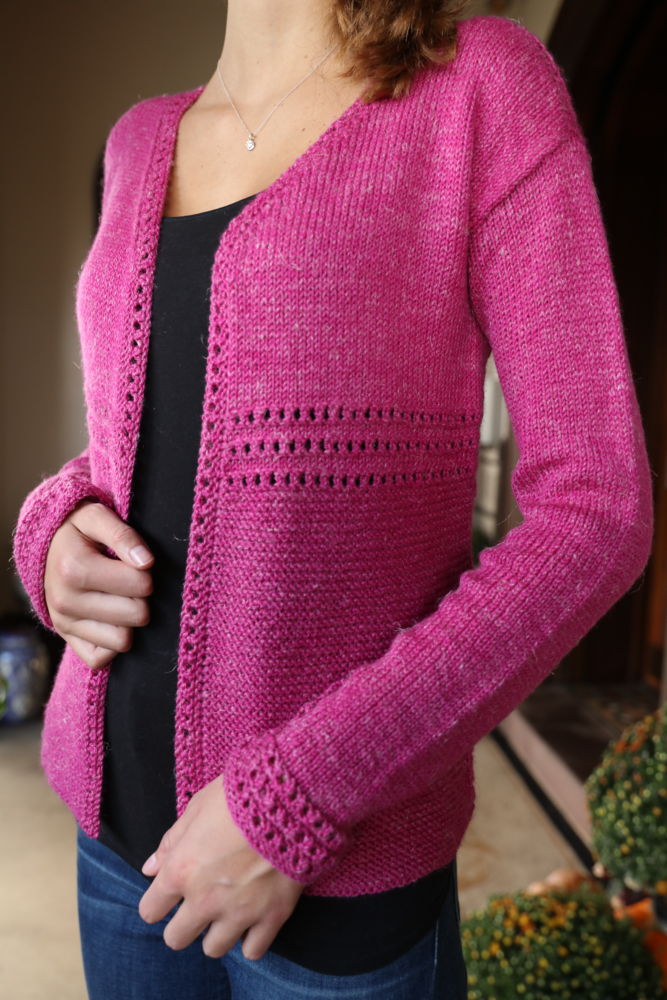
So let’s talk about working the fronts for this cardigan; the fronts differ from the back in that they are worked using garter stitch and stockinette instead of the lace pattern. There is a lot of math and calculations in this lesson; since the fronts are so simple (garter and stockinette with a few eyelets), this lesson will focus mainly on fit.
DOUBLE CHECKING THE SIZE
First we will check what size in the pattern is the best for a bust measurement fit. Then, we will see how that fits the hips size and whether we need to alter it any. Since many women (me included) carry extra weight in the front (bust or belly or both), I am providing tips on how to make alterations for a great fit! I also have instructions on how to reduce circumference in the bust if the recipient needs more hip with less bust circumference.
Make sure you have the intended recipient’s
- Bust circumference measurement
and
- Hip circumference measurement
If your swatch from the back matched the gauge called for in the pattern and you did not make any changes (like a smaller needle for shaping partway up the back), then you can work from the measurements posted in the pattern.
If you changed the gauge at any point for the back, you need to calculate your new size for that area based on the new gauge, for example:
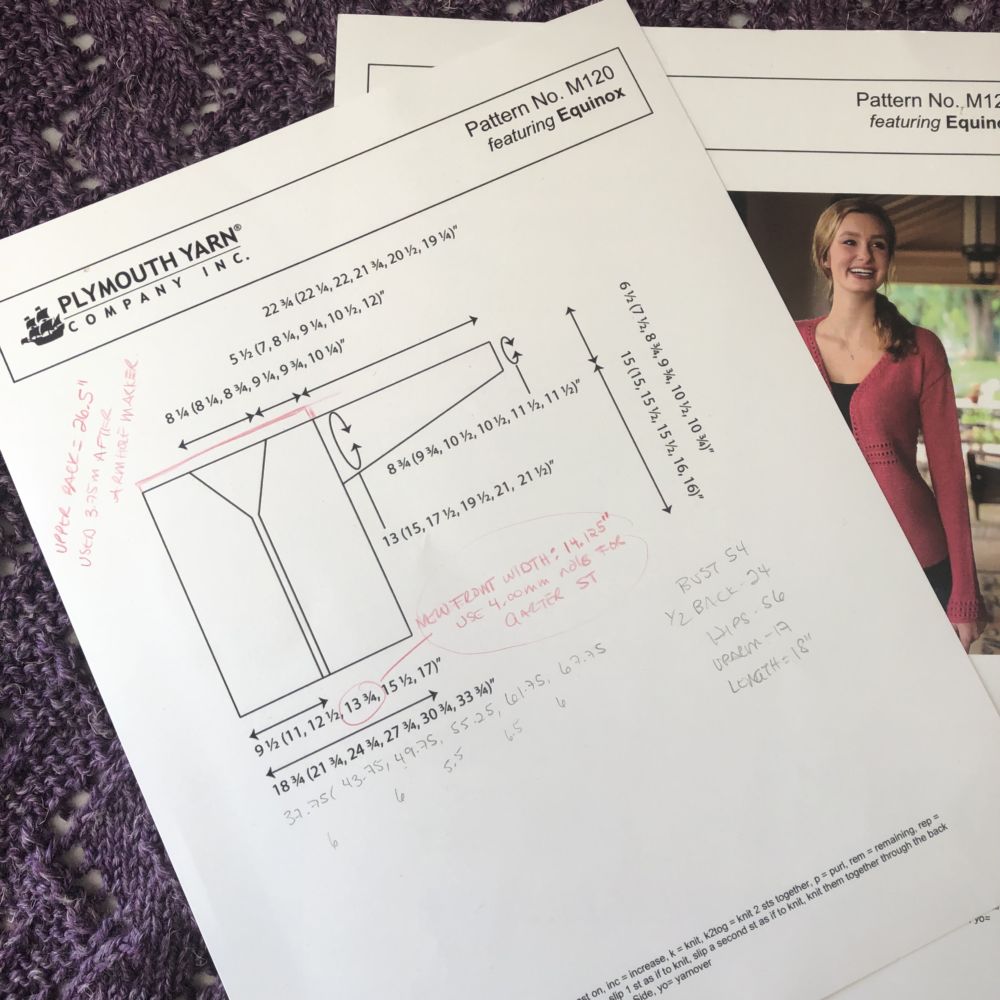
I used a smaller needle size for the upper back after placing the markers for the armhole openings. Since this is above the bust, it will not affect my bust or hip circumference, but it will affect my shoulder width (more on that in a minute). If you are a shapely Pear or Hourglass silhouette, you may have opted to go to a smaller needle size partway up the back for a more A-line shape. In that case, you need to take your [total number of stitches cast on] and divide it by [the number of stitches per inch] in your new gauge to accurately know the width of the back.
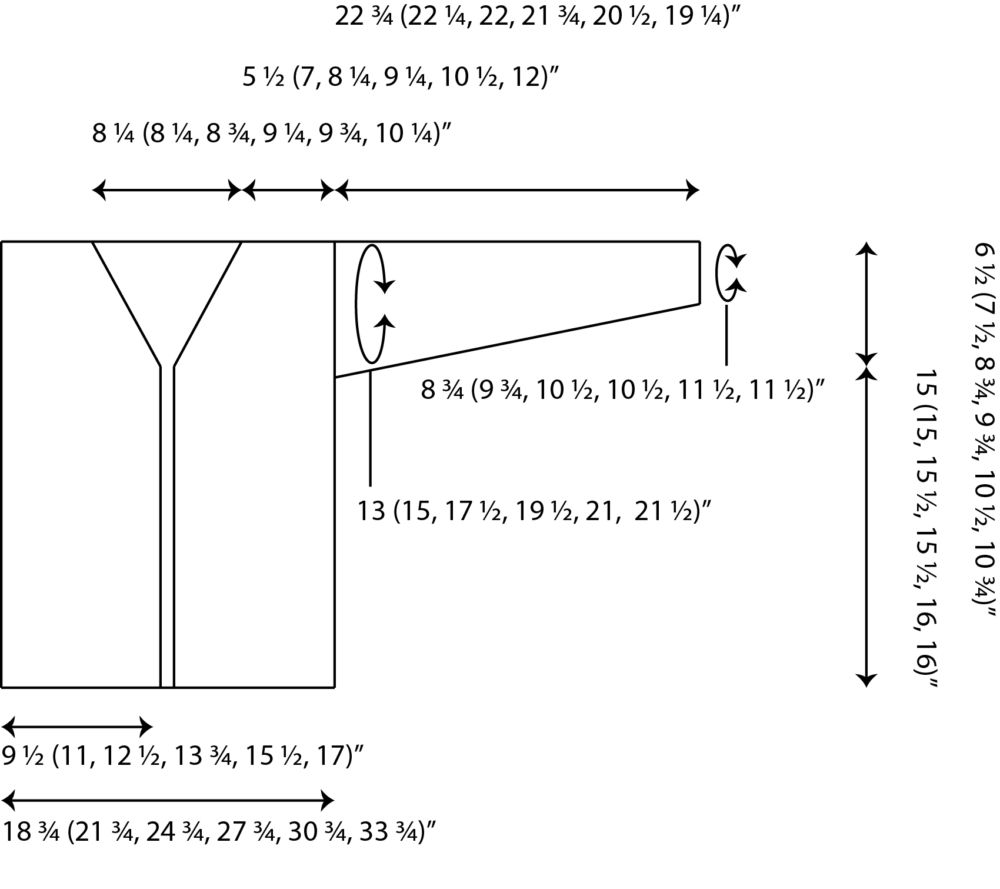
THE HIP CIRCUMFERENCE
So, looking at the schematic, we will start with a few easy calculations:
First, take the total hip circumference for the intended wearer and minus the width of the completed back hip.
For me this looks like 56 (bust circ) minus 27.75 (back width at hip) = 28.25 inches.
Then, take that remaining measurement and divide it by 2:
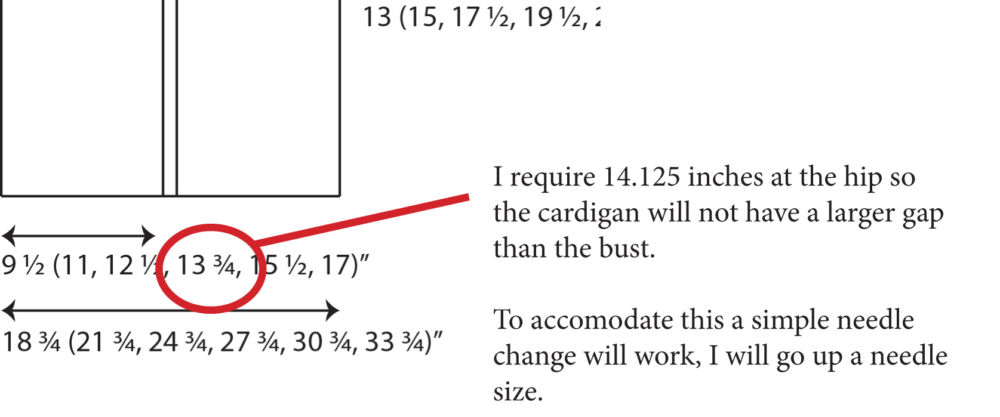
28.25 divided by 2 = 14.125 inches.
So, the remaining width for each front I need to cover around my hips is 14.125 inches.
Looking at the schematic, I can see that the fourth size (which is what I have been working from already) will not quite cover my hips; there will be a larger gap at the bottom than at my bust, which will make the sweater look like it does not fit (because it won’t!).
If your hip size fits into the front size, skip to >>The Bust Widthwise
What to do if you need more width for the fronts at the hips?
- 1-2 inches of width need to be increased overall (0.5-1 inches per front): try swatching the garter stitch with one size larger needle; calculate the size in the same manner (total stitches cast on divided by stitches per inchv= size of front).
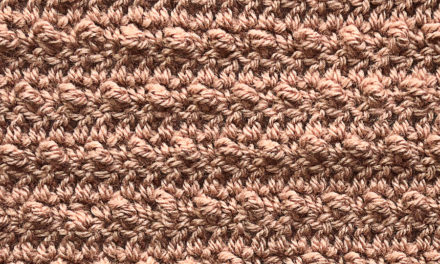
A note on garter stitch: Garter stitch is naturally about 10% larger widthwise than stockinette; it has to do with how the loops of the stitches seat into each other when you knit on both the front and back of the work. This is why most patterns indicate to reduce the needle size when working garter stitch. We can manipulate this difference when sizing this pattern by simply working the garter stitch on the same size needle as the stockinette, which will make it wider at the bottom.
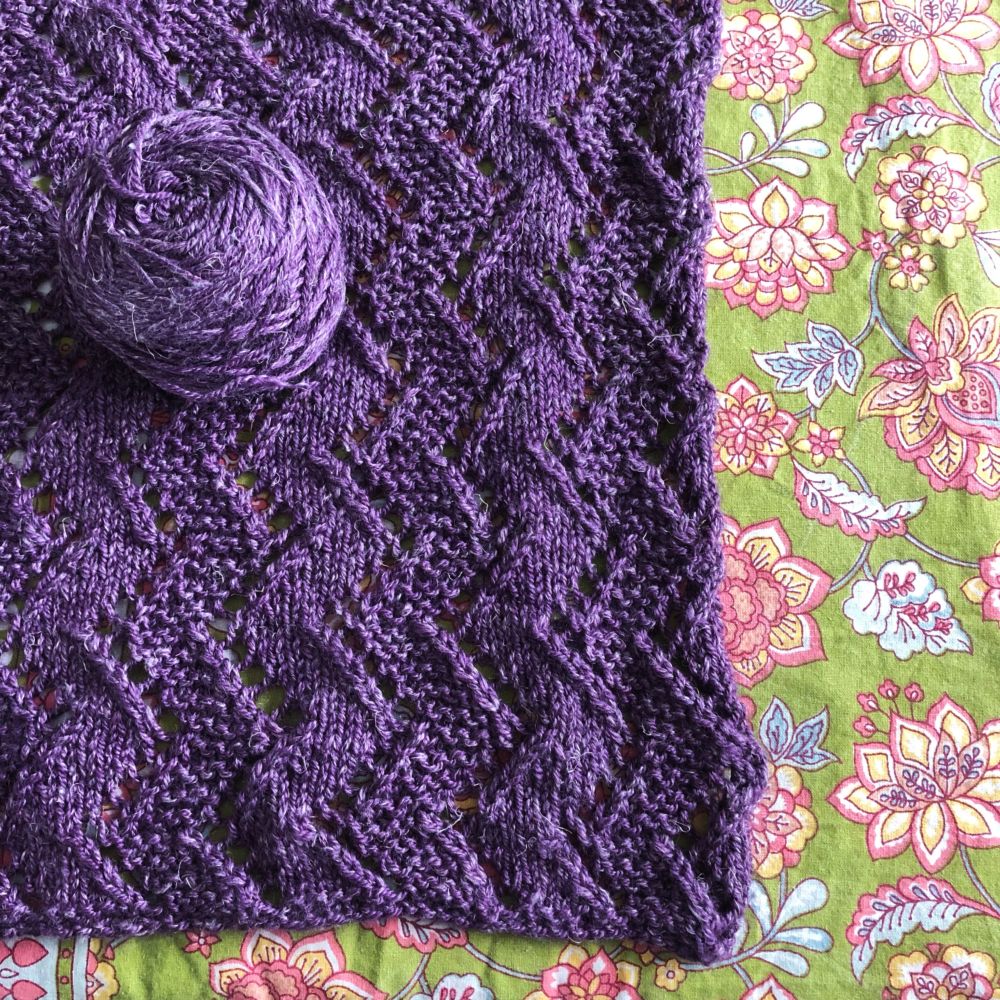
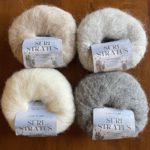
I have swatched the garter stitch on both the US 5/3.75mm and the US 6/4.00mm needles; on the smaller needles my gauge is 20 sts per 4 inches (top swatch in photo) and on the larger needles my gauge is 18 sts per 4 inches (bottom swatch in photo).
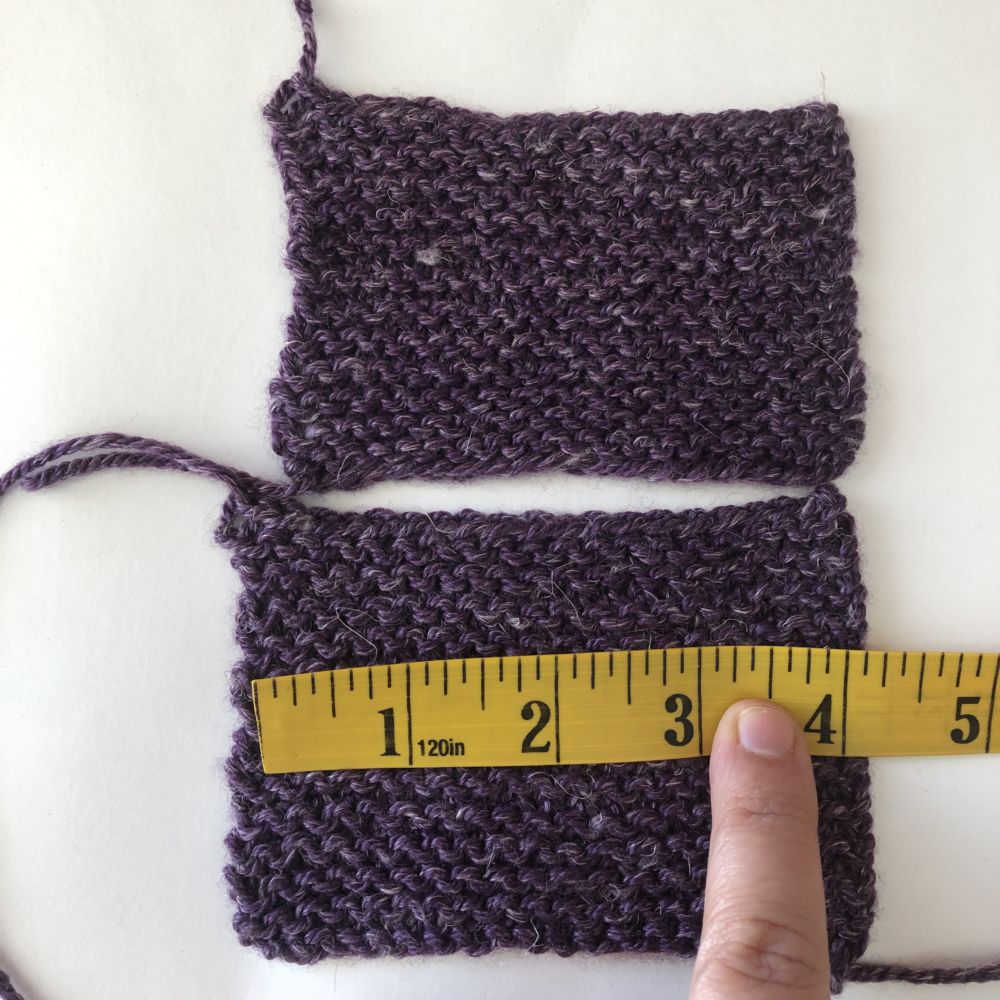
This means that if I use the larger needle for the garter stitch section, I will be working at a stitches per inch gauge of 4.5. If I divide my total front cast on stitches by this number I will get my final front hip measurement.
69 (cast on number for the fronts fourth size) divided by 4.5 (sts per inch over new garter stitch gauge on larger needles) = 15.33 inches.
I needed to have 14.125 inches, and so this will not only cover my hips but give me some positive ease.
What if you need even more circumference for the hips? Click the drop down box below for additional info on how to adjust the stitch counts.
How to work further hip alterations for more or less circumference.
What if simply using a larger needle size is not wide enough for the Hips?
• 2-4 inches of width need to be increased overall (1-2 inches per front): Check to see if the next size larger on the schematic will fit you well; if not, try taking your goal front width measurement and dividing it by 5 sts / 1inch (the patterns’ stated stockinette gauge) and see what you get.
It is absolutely possible to add decreases into the sides of the garter stitch section if your hip stitch count happens to be larger than your bust stitch count.
A Note on this option: If you are going to use the next larger size, you will need to see whether that is also the case for the bust area, or just the hips.
Decreasing Stitches in the Garter Section
If you have opted to use the next larger size over the hips, you will have additional stitches to decrease before working the Front Shaping. To decrease those stitches follow these steps:
1. Calculate your garter stitch rows needed before the eyelet row. (X)
2. Calculate the difference in the stitch numbers between the original size and the larger size. (Y)
3. Divide the total number of garter stitch rows by the difference in stitch counts. (X/Y=Z) You will work Y number of decreases every Z number of rows.
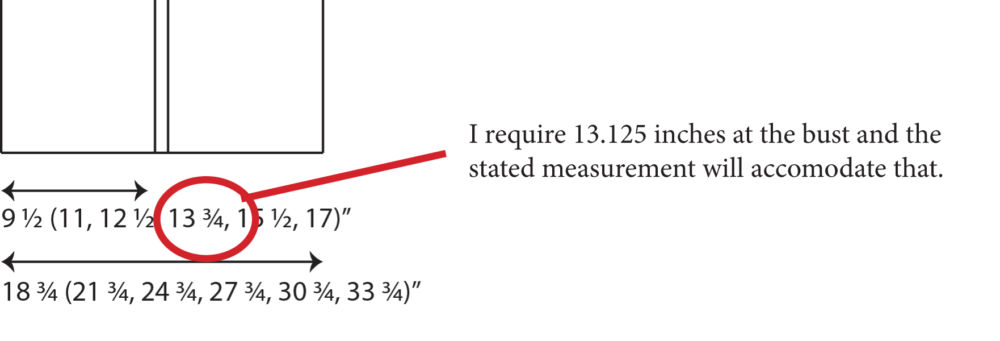
THE BUST CIRCUMFERENCE
We will do the same kind of calculation for the Bust, but now we are working with stockinette stitch;
First, take the total bust circumference for the intended wearer and minus the width of the completed back at the bust.
For me this looks like 54 (bust circ) minus 27.75 (back width at bust) = 26.25 inches.
Then, take that remaining measurement and divide it by 2:
26.25 divided by 2 = 13.125 inches.
So, the remaining width for each front I need to cover over my bust is 13.125 inches.
Looking at the schematic, I can see that the fourth size (which is what I have been working from already) will cover me nicely at the bust.
If your bust size fits into the front size, skip to >>Length in the Garter Area
What to do if you need more width at the bust?
- 1-2 inches of width need to be increased overall (0.5-1 inches per front): try swatching with one size larger needle; calculate the size in the same manner (total stitches cast on divided by stitches per inch= size of front)
What to do if you need less width at the bust?
- 1-2 inches of width need to be reduced overall (0.5-1 inches per front): try swatching with one size smaller needle; calculate the size in the same manner (total stitches cast on divided by stitches per inch= size of front
What if you need more or less circumference for the bust? Click the drop down box below for additional info on how to adjust the stitch counts.
How to work further bust alterations for more or less circumference.
What if simply using a larger needle size is not wide enough for the Bust?
- 2-4 inches of width need to be increased overall (1-2 inches per front): Check to see if the next size larger on the schematic will fit you well; if not, try taking your goal front width measurement and dividing it by 5 sts / 1inch (the patterns’ stated stockinette gauge) and see what you get. It is absolutely possible to add more decreases at the front shaping to accommodate extra stitches AND have a sweater that fits properly.
Adding Decreases for the Front Shaping
If you have opted to use the next larger size over the bust, you will have additional stitches to decrease for the Front Shaping. To decrease those stitches follow these steps:
- Calculate the total stockinette rows for the armhole depth: armhole depth x stockinette rows per inch = (X)
- Calculate the difference in the stitch numbers between the original size and the larger size. (Y)
- Divide the total number of stockinette stitch rows by the difference in stitch counts. (X/Y=Z)
You will work Y number of decreases every Z number of rows.
Reducing more width at the bust
- 2-4 inches of width need to be reduced overall (1-2 inches per front): Check to see if the next size smaller on the schematic will fit you well; if not, try taking your goal front width measurement and dividing it by 5 sts / 1inch (the patterns’ stated stockinette gauge) and see what you get. It is absolutely possible to remove decreases at the front shaping to accommodate fewer stitches AND have a sweater that fits properly.
Removing Decreases for the Front Shaping
If you have opted to use the next smaller size over the bust, you will have less stitches to decrease for the Front Shaping. To calculate your decrease schedule, follow these steps:
- Calculate the total stockinette rows for the armhole depth: armhole depth x stockinette rows per inch = (X)
- Calculate the difference in the stitch numbers between the original size and the smaller size. (Y)
- Divide the total number of stockinette stitch rows by the difference in stitch counts. (X/Y=Z)
You will work Y number of decreases every Z number of rows.
TAKE NOTES ON YOUR SCHEMATIC PAGE: I can’t stress this enough, you might finish this sweater with the knit along, or you might finish it in 3 years. Either way, you will want to know what you did and how you altered it!
LENGTH IN THE GARTER AREA
Since Garter stitch tends to stretch out lengthwise after blocking, we are going to base the length of the garter stitch section on rows per inch from the blocked swatch AND make sure it ends so the eyelet section is in the middle of the narrowest part of the body.
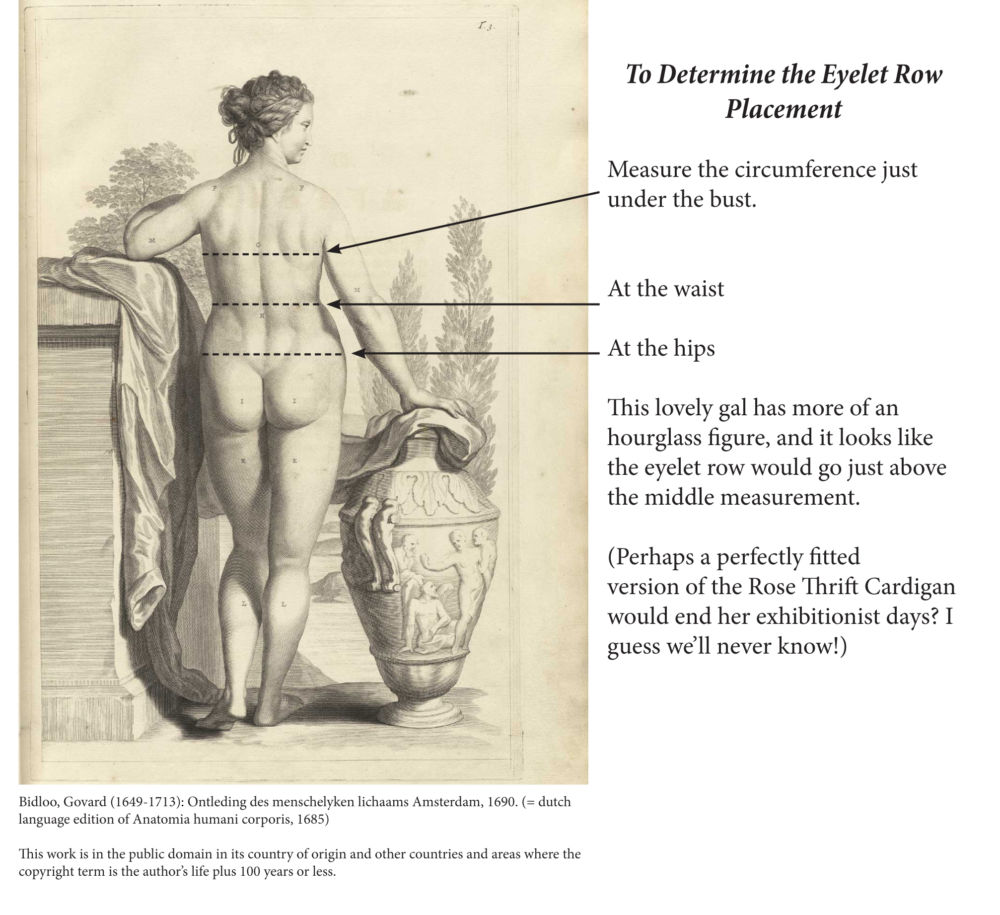
Find the narrowest part
We are going place the horizontal line of eyelets right in the middle of the narrowest part on the wearer’s torso. This creates an optical illusion, drawing attention to the narrowest part and therefore not the widest parts. As you can see on the model, this eyelet row sits above her natural waist but still at the narrowest part of her body.

The pattern as written states a general length based on the narrowest part of any torso being about 5 inches down from the armhole opening. This will probably work for ‘most people,’ but we are not most people! We are super sweater alter-ers who are winning at math to make a perfect garment. Beginning under the bust, measure the circumference every 3-4 inches down the body and see what spot is the candidate for an eyelet round.
For me: An inch under my bust is 47 inches, 4 inches down I go up to 51 inches around, about 4 inches lower I am 53 inches around, and 4 inches lower than that my hips start at 57 inches around. So I want to place the eyelet stripe right before my bust.
Numbers needed:
- On my back I had calculated that I wanted my length to be 16.5 inches from hem to armhole opening.
- The eyelet stripe is about 2.5 inches wide.
- I need the eyelet stripe to sit 1 inch below the armhole depth (this will be worked in stockinette, and will be 6.5 rows, rounded to 6 rows)
- My row gauge over garter stitch is 18 rows per 2 inches = 9 rows per 1 inch.
So I will take the 16.5 inches and minus the 2.5 inches for the garter stripe and 1 inch for the stockinette area = 13 inches remaining.
For your sweater: Take the total length of your lower body, minus the 2.5 inches for the garter stripe, minus any length worked from the garter stripe to the armholes = length to work in garter stitch before the eyelet stripe.
Working out the Garter Rows
Now take the length needed in garter stitch and multiply it by the rows per inch measurement of the blocked garter stitch.
For my sweater: I will take the 13 inches and multiply it by 9 rows per inch, which makes 117 rows (rounded up to 118 since I need an even number of rows).
Since each ridge of garter stitch takes 2 rows of knitting, I know I will need 59 ridges on each side before I start the eyelet stripe. And I will place my armhole marker after working the eyelet stripe.
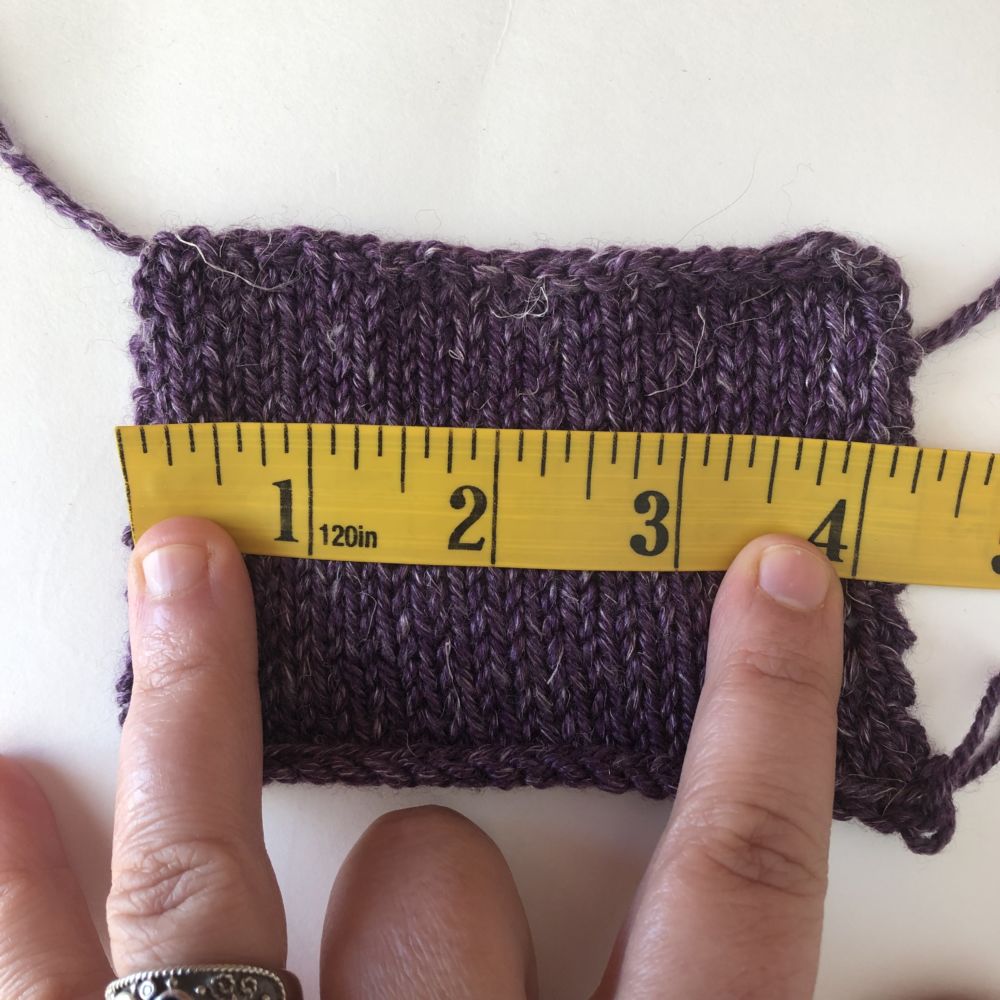
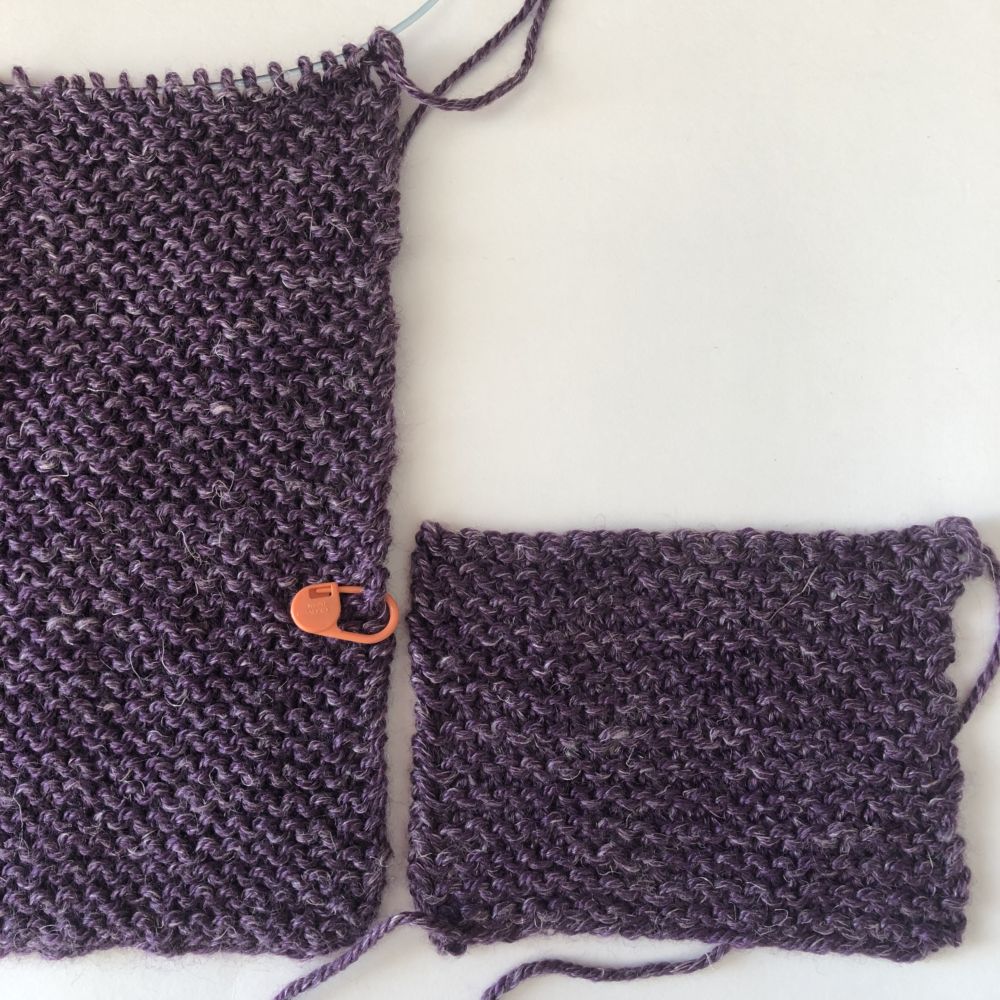
Working from the blocked swatch and knitting a number of rows versus a noted length will mean that your blocked sweater will be exactly the right size after blocking. But this means that your knitted front before blocking might not meet the measurements stated in the pattern, never fear! You did the math! It will be fine after you block. As you can see from the photo, the blocked swatch versus the unblocked knitted front, with the same number of rows indicated by stitch marker.
Why doesn’t the pattern just state the rows instead of a measurement? Glad you asked! Since row gauge can be more challenging to alter than stitch gauge and every knitter knits differently = possibly different row gauge, there is no way for a designer to know how many rows YOU need to knit to get the right length in a pattern. We already control the stitch gauge like mathematical tyrants, so the row gauge (although stated in the pattern) tends to be more flexible. Patterns need to be “one pattern all can knit” type of things, but we now know that a Knitter’s Superpower is being able to measure the body, check the schematic, block the swatch and do a tiny bit of math to ensure a perfect fit!
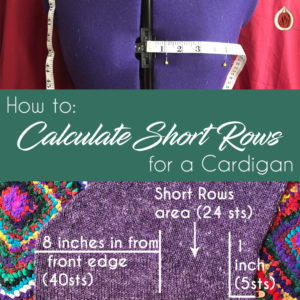
WHAT ABOUT ADDING SHORT ROWS?
If you think you might need short rows in the bust area, you will need to measure the difference between the length measurement over your bust and beside your bust.
For an in-depth step-by-step post on how to calculate these short rows click here: How to Calculate Short Rows for a Cardigan.
Homework
If you would like to keep up with the steps in this knit along, then I invite you to work on the Left Front. Lesson 3 will include a tutorial on how to seam the shoulders (the stitch count is different for the fronts and back shoulders) and deal with any alterations that were made to size.
Please Note: This pattern contains a typo, when working the Left Front change to a US 6 / 4mm needle not a US 7 / 4.5mm as written.
Sharing!!
I would LOVE to see photos of your progress on this Knit along, please share photos via Instagram using the hashtags #plymouthknitalong #rosethriftkal you can tag Plymouth Yarn using @plymouthyarn and tag me using @meghanjoneslnmp.
Questions? Comments?
Feel free to leave questions and comments in the comment section of this post, I will respond to questions as quickly as possible as well as add any Frequently Asked Questions to the bottom of this post for reference.

Meghan Jones is a full-time knitwear designer who lives with her husband and 4 children in the Inland Northwest. When she is not knitting she spends her time nurturing obsessions with gardening, cooking, and sharks. You can find more of her work at www.littlenutmegproductions.com on Instagram, Facebook, and Ravelry.

Recent Comments