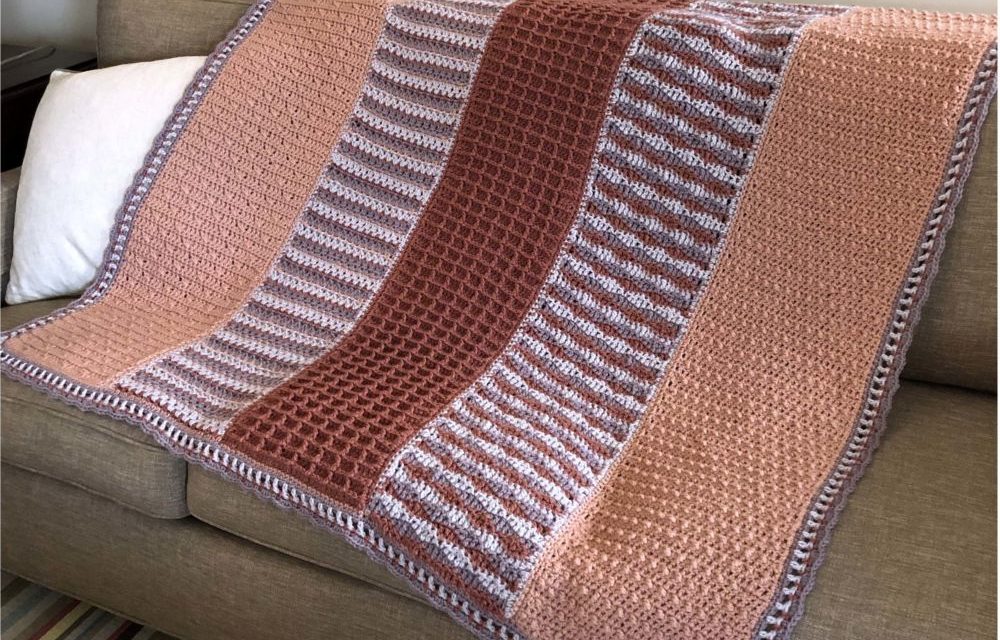
We’re in the home stretch! Now it’s time to see all your hard work come together.
In case you are joining us later, start with the pattern introduction, Panel 1 , Panel 2, Panel 3, Panel 4 and Panel 5. You can also download the entire pattern as a printable pdf.
One of the most overlooked parts of crocheting is the finishing. Taking the time and care now is what will make your blanket look as professional and polished as possible. As tempting as it is to see your blanket complete, don’t skip these steps!
Assembly
Blocking
Read How to Block Knitting & Crochet.
Block pieces to stated dimensions, making sure that each panel is the same length. Add rows or pull out rows as necessary to reach the desired length.
With RS facing, place a marker in the lower right {upper right} corner of each panel. Make sure that the foundation row is at the bottom.
Selvedge Preparation
Refer to the assembly diagrams below for help in understanding the following instructions. You will be putting a single crochet edging along the interior selvedges of the panels.


Panel 1
With A and RS facing, standing sc in side of lower right corner st {upper right corner st}; sc evenly spaced along selvedge to top {bottom} corner. The sample afghan used 174 sc along this edge. Adjust your count to fit your gauge. It is more important that the edge lie smoothly than that you get the same number of stitches as the sample. Fasten off.
Panel 2
With D and RS facing, sc evenly along both selvedges of panel, using the same number of stitches as you used for Panel 1.
Panel 3
With B and RS facing, work sc edging along both selvedges as for Panel 2.
Panel 4
With D and RS facing, work sc edging along both selvedges as for Panel 2.
Panel 5
With A and RS facing, work sc edging along left selvedge only; do not fasten off.
You should have the same number of sc along both long edges of Panels 2, 3, and 4, and along one edge of Panels 1 and 5. Your last yarn tail is at the lower left corner {upper left corner} of Panel 5.


Seaming
Hold Panels 4 and 5 with RS together, ch 1; working through both layers, sc in each sc across—174 sc (or the number of sts you used). Fasten off.
Continuing in this manner, single crochet remaining panels together, using color B to seam Panel 3 to Panels 2 and 4, and using color A to seam Panels 1 and 2. Do not fasten off A at end of last seam.
Weave in all other ends.
Border
Border Foundation Round
Remove markers. Place marker in each corner st of afghan—4 markers.
Continuing with A, sc evenly around, placing sts as follows:
3 sc in each marked corner st, move marker to center of these 3 sts;
151 sts along each short edge;
175 sts along each long edge.
Join with slip st to first sc. You should have 153 sts along each short edge, 177 sts along each long edge, plus 4 marked corner sts. Fasten off.
If you found it necessary to change the number of stitches to allow the edges to lie flat, try to adjust your stitch count so that you have a multiple of 4 stitches + 1 on each side, not counting the four marked corner stitches. The number of stitches on each short side should be the same and the number of stitches on each long side should be the same.
Having the correct number of stitches will make stitching your border much easier, but if you are a stitch or two off, you can fudge the count a bit.
Border Pattern

Rnd 1: With C, (standing sc, 2 sc) in any corner st, *sc in each st to marked corner st**, 3 sc in marked st; rep from * around, ending last rep at **, join with slip st to first sc—155 sc on each short edge, 179 sc on each long edge, 4 corner sts.
You should have a multiple of 4 + 1 sts along each side, not counting the marked corner sts. If you had a different number of border sts, adjust your stitch count to end up with this multiple along each of the four sides. Fasten off.
Rnd 2: With D, (standing dc, ch 3, dc) in any corner st, *ch 1, skip 1 sc, [dc in next sc, ch 1, skip 1 sc] to corner st**, (dc, ch 3, dc) in corner st; rep from * around, ending last rep at **, join with slip st to first dc. Fasten off.
Rnd 3: With B, (standing sc, ch 2, sc) in any corner space, *ch 1, [sc in next space, ch 1] to corner space**, (sc, ch 2, sc) in corner space; rep from * around, ending last rep at **, join with slip st to first sc. Fasten off.
Rnd 4: With C, (standing sc, 4 hdc, sc) in any corner space, *4 hdc in next space, [sc in next space, 4 hdc in next space] to corner space**, (sc, 4 hdc, sc) in corner space; rep from * around, ending last rep at **, join with slip st to first sc. Fasten off.
Weave in all ends. Block lightly if desired.
A Final Word
 I hope you’ve enjoyed making the 5-Panel Crochet Blanket and that you’ve learned some tips and tricks you can use on future crochet projects. If you’ve enjoyed crocheting along with me, please subscribe to my newsletter, where you’ll receive technique tips, discounts on patterns, and news of interest to crocheters.
If you’d like to take a class with me, the newsletter is the best place to learn of my upcoming in-person teaching events. I also teach online on various platforms.
And I’m always happy to hear from you directly, through social media or email.
Happy crocheting!
Edie


Recent Comments