How to Pick Up Stitches Correctly and Evenly
Picking up stitches is something knitters have to do in just about every garment they knit.
It’s how you get stitches on the needle to knit button bands, neck bands, sleeves knit from the top down, and many decorative edgings. In the pattern below, 3240 Poncho with Sleeves, stitches are picked up for the turtleneck, the hem, and the sleeves.
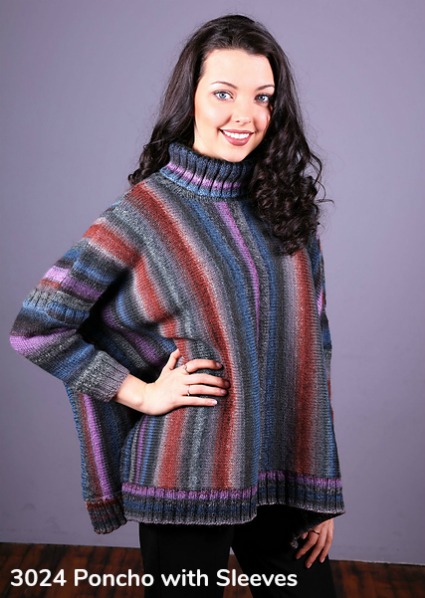
This is such a cute pattern, and the ribbing at the hem and neckline really pop. Picking up stitches correctly is crucial to getting a professional look on this. But don’t worry, you can do it! (This pattern is knit with Gina yarn.)
In my classes, I get asked all the time about the difference between the directions “pick up stitches” and “pick up and knit stitches”
Technically, “picking up stitches” means putting already knit stitches on your needle and knitting them perpendicularly. I saw this demonstrated once on a garter-stitch edge, and it worked, but generally (meaning always, for me), “picking up stitches” and “picking up and knitting stitches” means the same thing:
Insert your needle between the outermost column and first column in, wrap your yarn around the needle as if to knit, and pull the needle through. Repeat.
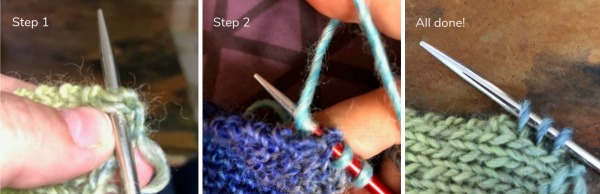
Picking up stitches on a vertical edge. (All swatches in this post are knit from Gina yarn, which I love. If you haven’t knit with it yet, make it your next project!)
I’ve never picked up existing stitches when instructed to pick up or pick up and knit, and my garments have turned out fine.
Oh, but let me clarify—if your pattern has instructed you to leave existing stitches on a holder, such as at the back neckline, you’ll put those back on your needle, but your pattern will likely say “knit stitches from holder” or something similar, and not “pick up stitches.”
Pick up stitches in the middle of the “V.”
Picking Up Stitches on Horizontal Edges
For a tidy look, pick up in the middle of every stitch, right below the bound-off edge. By “the middle,” I mean in the V of the stitch. This way, your stitches will line up perfectly and you’ll get an almost seamless result.
Picking Up Stitches on Vertical Edges
Here, you’re picking up stitches to knit perpendicularly. There are different things to keep in mind when picking up stitches vertically in stockinette and garter stitch. Read on.
Stockinette Stitch
Row and stitch gauge is rarely (or never) the same in stockinette stitch, so you need to account for that when you’re picking up stitches. If you don’t, you’ll have too many stitches and your button band (or whatever edging you’re picking up stitches for) will be wavy, which you don’t want. Not cute.
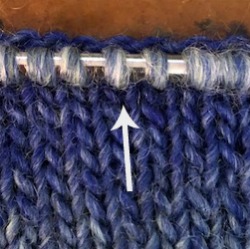
The general rule for picking up stitches vertically in stockinette stitch is 3 stitches per 4 rows. You can see that in the example below. The arrows are pointing to the slightly larger space every three stitches.
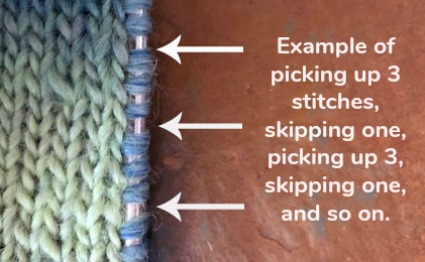
“But I’m knitting my button band on smaller needles, so I should be fine!” Nope. You still need to account for that row vs. stitch gauge; unless you’re going down several needle sizes, you just do.
Garter Stitch
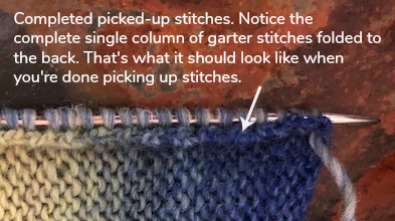
Because you have more rows per inch in garter stitch than you do in stockinette stitch, a good rule of thumb is to pick up one stitch between each garter ridge, as shown below.

So, when you’re picking up stitches in garter stitch, pick up a stitch in the space between each “bump” on the selvedge edge. That bump represents two rows, or a garter ridge, so you’ll always get the right ratio.
Picking Up Stitches Along a Curve
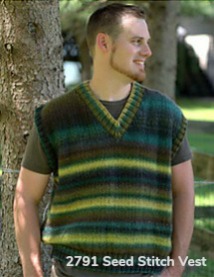
In this pattern, the Seed Stitch Vest, stitches are picked up for the neckline and the armholes, so you’ll be picking up stitches along curves and dealing with decreases. (Knit with Gina yarn.)
If you’re picking up stitches along a curve, like an armhole or a neckline, the same rules apply:
- In stockinette, use the 3 to 4 ratio (3 stitches picked up every 4 rows).
- In garter, use the 1 to 2 ratio (1 stitch every 2 rows).
- When you come to bound off stitches, such as at the bottom of the armhole, use the 1 to 1 ratio (1 stitch picked up in the V of each stitch).
When picking up stitches along a curve, you’re likely to come across decreases. I always pick up stitches between the outermost stitch and the next column of stitches, and I keep that rule in curves, too. It’s sometimes hard to see the spaces between the columns when the decreases are on the edges, but poke around with your needle and you’ll find them.
Using a Crochet Hook
Some people insist on using a crochet hook to pick up stitches. This adds another step—you have to transfer the stitches from crochet hook onto your knitting needles—so why bother? Just pick them up onto your needle and you’re ready to go.
Picking Up Stitches Evenly
Many patterns say something vague, like “pick up 100 stitches evenly along the left front.” (This would be for a button band or similar edging.) I can tell you from experience that it’ll be a miracle if you get it right the first time. I may be overstating it a bit, but there’s nothing more frustrating than picking up 100 stitches and having six inches of your sweater left!
If I have a lot of stitches to pick up, I use markers to help me. Here’s how:
- Place markers every 10 rows. Say you use 11 markers.
- Count the spaces between markers. If you use 11, you’ll have 10 spaces.
- Divide the number of stitches to pick up by the number of spaces between markers. If you have 112 stitches to pick up, you’ll need to pick up 10 stitches between each marker, plus 2. (Just put an extra stitch in 2 of the spaces.)
This always works for me, and it saves so much time.
I hope these tips help you when you have to pick up stitches. Doing it right can really make a difference in your project. I’m one of those knitters who thinks it’s all in the finishing, and picking up stitches correctly is an important step.
So go forth and pick up your stitches with confidence!
Cheers,

P.S. Did I miss anything? If you have a question I didn’t answer, just leave a comment!


Recent Comments